Barbie Banner Making and More!

For Makenzies 2nd Birthday, Heather asked if it was possible to make a “Happy Birthday!” banner for under $30. UMMM YES!!! Everyone’s first instinct is to go buy stuff like this off Etsy or similar online stores but I was able to make a banner for Heather for a whopping $4.00 and I’m not kidding. The banners were going on the cake table and presents table! Check out my blog post on the Barbie Cake I made for Makenzies Second Birthday! Pictures of the cake are also at the bottom of this post 🙂

The cardstock paper was on sale at Michael’s… 6 sheets for $1.00, so I got as much as I could. I had ribbon, some pink paper on hand, and of course my trusty eCraft!

I love this machine so much :)
This machine is amazing. It’s like a cricut but its mat less. I was able to hook it up to my computer (with the downloaded eCraft software), I found some SVG files of Barbie heads and got to work!

IMG_4328

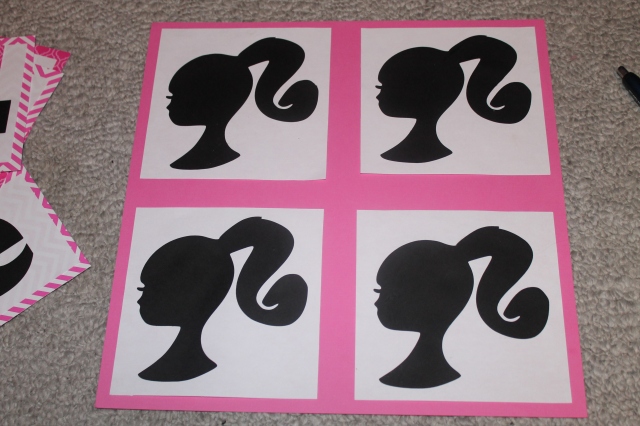
These were free images and so so so cute! I cut out 4 large Barbie heads

IMG_4329

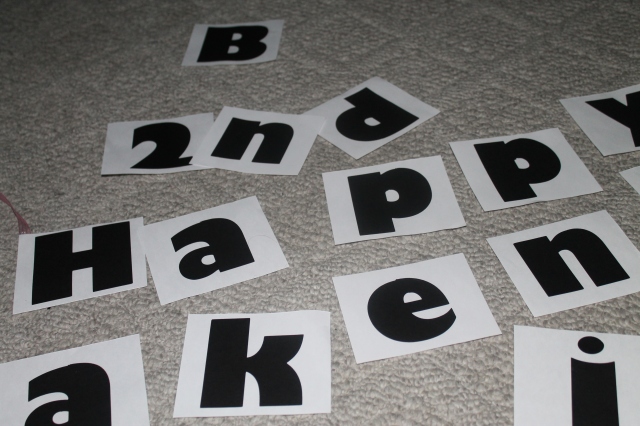
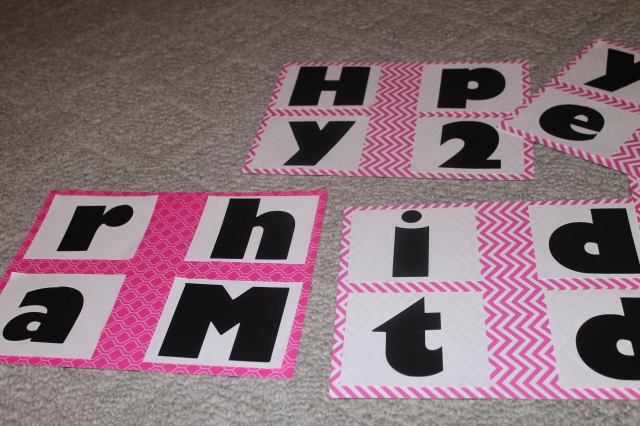
Then I cut out the letters I needed. ANY font on Microsoft Word can be used on the eCraft as well. I like to use the fonts that are boxy and thick, since its easier to cut out on the machine.

IMG_4331

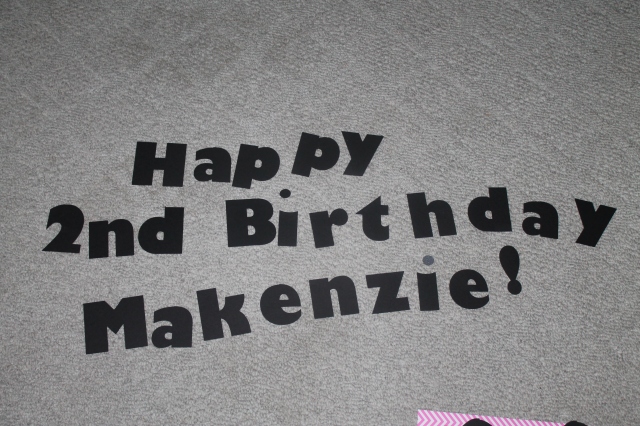
Then I put all the letters on a white background.

IMG_4332

Then put them all on a sheet of colored pink paper. I alternated it so it went chevron print, then the other print etc. I don’t know why but I always have to double everything on paper. I feel like everything looks cuter with a border! It makes it look more professional!

Also, doing square instead of round helps to save paper.

IMG_4336

IMG_4337

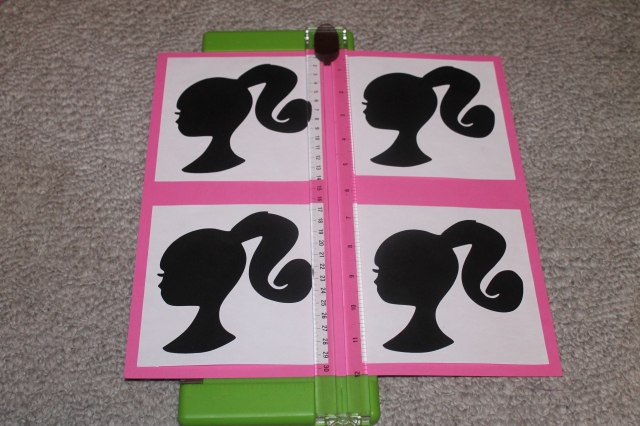
That’s my trusty paper-cutter! It measures out paper perfectly and makes straight nice lines!

IMG_4338

 IMG_4345

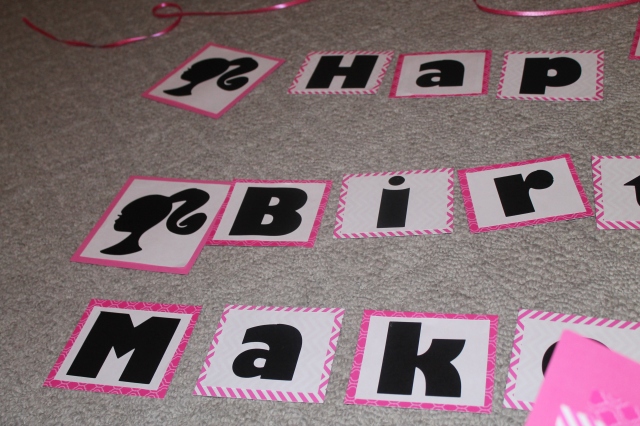
I recruited my mom and Mike for banner holding duty -lol- I made the banner then realized adding the “2nd” made it too long! So the end result doesn’t have the “2nd” and we separated “Happy Birthday!” for the cake table, and “Makenzie” for the present table!

   IMG_4341

I tape the back of each sheet to the ribbon to hold them all in place.

 IMG_4339

IMG_4346

And here’s the final result!

IMG_4505

So girly!

 IMG_4526

IMG_4545

The banner just brings it all together! And dresses up the tables nicely!

IMG_4482

the banners worked out perfectly for both tables!

Everything else came out so amazing for Makenzies Birthday party too! Heather spent a lot of time planning and making all of the little details!

Adorable party favors Heather made!

These are all cute little Hershey kiss party favors!

IMG_4487

Heather made the card box! she simply wrapped a box in pink paper, added a Barbie head, and some number 2’s that I cut out on my eCraft machine for her!

IMG_4488

Half of the tables got these center pieces. These are foam boxes covered in pink and black paper.

IMG_4489

And the other half of the tables had ballons with the same Barbie confetti and Hershey kisses scattered!

IMG_4490

 IMG_4557

The friend table!

IMG_4585

the princess girl eating a lollipop!

IMG_4562

Anthony does this thing at every party where he fills up a box with candy and when I say fill… I mean it. This box was up to the very top with all kinds of candy! And then he just launches it in the air and the kids go CRAZY!

IMG_4571

Daddy helping the birthday girl!

IMG_4572

IMG_4626

All of my girlfriends and I 🙂 I love us! We are the Elite 8 -lol-

xoxox- Dani

Annual Girls Grab Bag :)

Every year the girls and I do a Christmas Grab Bag! We do a $40 dirty Santa Grab Bag and we ALSO do a $10 dirty Santa Gag Gift! The gag gift is always the most fun. The gifts for that are hilarious! Some are so bad and naughty I feel weird listing them on my blog -lol- just this alone would put all 8 of us on Santas Bad List!!!!

We decided to make this years grab bag festivity into a brunch on Sunday! December is so crazy and it was hard to find a day all of us could definitely get together therefore this worked out perfectly and really who doesnt love everything that comes with doing a brunch!?

IMG_4456

MIMOSA’S! YUM

4 of us brought OJ, the other 4 brought the champagne! My sister made a Peach Orange Juice which was extra amazing. She just halved a bottle of OJ and filled it back up with Peach Nector.

IMG_4455

^Do you see those cups?!^

You have no idea how wonderful these truly were. My friend Maria made them. I searched Pinterest and found the recipe:

http://www.marthastewart.com/330179/bacon-egg-and-toast-cups

Looks like its from Martha Stewart which I dont doubt for a second! At first I thought the egg was gonna be all runny and I’m not into that, but when I bit into it and it was more of a hard boiled egg/eggs-that-are-in-a-Mcdonalds-Breakfast-Sandwich kind of consistency… I was in love!!! And bacon…. don’t even get me started!

So simple too! Line greased muffin tins with smashed down bread… lay a half cooked piece of bacon in there, crack an egg over the bacon, pop into oven for 20-25 minutes. YUMMMMMMMMMMMMMMMMMMM

IMG_4427

Becca made this delicious French Toast with a rich buttery maple syrup sauce on the bottom!

IMG_4425

Anne made pancakes. I thought this was the extent of them until…

IMG_4426

She added a raspberry to each one! Then it really was game on for these babies!!

  IMG_4424

My sister made some bacon, green onion, ranch, and cheese crescent roll ups!

yummo

And I made s’mores dip, you can find that on my blog post with the recipe here: http://glitterbatterandothermatters.com/2013/12/10/smores-dip/

Some things I didnt get a picture of: Heathers hash brown casserole and Sam’s fruit dip!

But all in all I think it’s safe to say that we as a whole… DO NOT mess around when it comes to get togethers and food. We always out do ourselves 😉

IMG_4429

The kiddos opened their gifts first!

IMG_4428

Ella snapping pictures of Cameron!

IMG_4438

IMG_4448 IMG_4447

IMG_4451 IMG_4452

IMG_4437

Ummmmm lets talk about these Michael Kors flats! So cute, I’d wear them!!

IMG_4435 IMG_4434

socks

Becca got all of us Christmas socks… which were a huge hit because even at 24 and 25 years old we all enjoy the idea of having matching things and all wearing the same stuff -lol-

I didn’t get pictures of our grab bag but items included:

All kinds of jewerly, scarves, socks, candles, hair stuff, nighties, scrapbook supplies (who do you think gifted that?! Me of course haha always encouraging the creativity! I just thought it was so neat… Michaels sold these packages for scrapbooking that included a 12×12 scrapbook, stickers, paper etc!). So much good stuff! Now the gag gifts… I will leave those to your imagination!!

Merry Christmas!!!!

xoxo

-Dani-

Caviar Nails Ooo La La

Nails are my favorite and least favorite thing to worry about. I really don’t enjoy painting them, but I love when they are painted. So, like every other woman I am forced into this life of painting my nails and seeing them be ruined in less than a day. Maintenance. Constantly. I mean really they chip after I eat a meal, it’s ridiculous. But nonetheless… Yay! Caviar nails!

My good friend Maria was pinning the hell out of caviar nails, then she told me how she got some of the micro beads for it at Michael’s for $7.99! Compared to Sephora wanting like $16.99! Say whhhhatttt?!

Off to Michaels I went.

 Here is the pack I got:

MicroBeads!

But they also come in the other color pack, on the righthand side. Maria sent this picture of both packs that she got, I only got the one on the left since the other one was not in stock!

I do LOVE that black, silver, copper etc combo!

I decided to paint my nails a minty lime green and accent my ring fingers with some green beads! I am going to the Green Tie Ball with my friend Calli. It’s a huge Gala held every year in Chicago to help fundraise for Gateway Greens Expressway Partnership program which helps maintain Chicago’s beautiful landscapes along the expressways. The dress code is black and green, so in honor I am painting my nails to go with the code 😉

20130905-201623.jpg

This is the color combo I went with!

Application is quite simple, I used these three bottles of polish.

1.) Use a base coat if you have one handy

image (1)

I used my sisters Orly Rubberized Base Coat, it gives your nails an actual rubber feeling. Maybe this helps keep the polish on longer, who actually knows. It’s like a primer so why not use it if it might help your nails stay fresh a little longer.

2.) Then paint your nails with your polish color of choice. I used a minty lime green color by Color Club in London Calling. I got this polish in my BirchBox a few months ago. I love it, and it’s really pigmented.

3.) When you get to your ring finger  (or whichever finger you want the caviar -micro beads- to go on), you want to apply your polish then immediately apply your beads while your nail is still wet. I tried applying it both ways: pouring it onto the wet nail, or pressing the wet nail into the beads.

I preferred pouring it on. It seems like it was easier, cleaner, and way less messy looking on the actual nail. The container that the beads are in have an opening like this so it makes it easy to do.

image (2)

You want to pour it on your wet nail over something such as a small bowl:

image (3)

This helps to catch the beads that fall. Then I just transferred the extra beads onto a sheet of paper and poured it back into the little holder.

image (6)

Then we’re left with a cute caviar beaded nail!

4.) And don’t forget the top coat! This helps to lock all those beads down to make them not fall off as easily.

image (4)

Again, I just used whatever top coat my sister had 🙂

image (5)

How cute is it!? I love that its textured.

image (7)

And here are my friend Maria’s nails with her Caviar version:

She used gold Micro Beads… LOVE!!!!! I love gold. Anything gold! Now I must go back to Michaels on Tuesday when they restock (yes I do weirdly know that) and get the other pack of colors!

UPDATE:

a couple beads fell off while I was at work today. I had the beads with me but not the nail polish. So, in my desk at work I found some nail glue

This nail glue really holds these suckers on! I might try to do the entire nail using this next time and see how that works!

Let me know any techniques you guys come up with 🙂

Awww Tootsie must be sad that she can’t have Caviar Nails!

Thrift Store Redo: Ironing Board 2.0

I love thrift stores.

I love browsing the aisles of thrift stores.

I love finding cool stuff and buying it for cheap.

Theres a pretty good one by my work called Unique. Its the same place I got The Jewerly Box  from that I gave new life to 🙂

I dislike when people are grossed out by thrift stores. Yes, they smell a little funny, you might see some strange people in there, and things might look a little dirty… but no one is asking you to lick the floors and marry the cashier! Seriously go into a thrift store and believe me you WILL find something that catches your eye. So many hidden gems.

On my last voyage, I came across this baby table top ironing board

        photo (4)

At first I was like, “Awwwwwwwww!! Its mini and cute!!” even with the terrible blue cover. But I saw past that ugly dull blue. I knew it could be more. It had these awesome flip out feet to elevate it, and a thin piece of foam under the blue cover that was still in good condition.

Even better? It was $3.99, and it had the blue colored sticker that reduced it by 33% so I got it for around $2.75!

What What!

Ironing Board

I recently got a Singer Sewing Machine and just from working on a couple sewing projects I realized I need an ironing board, but the big huge one is annoying to lug around the house

*Insert Cute Mini One*

It sat in my room for a week and then I decided it was time to work on it. I had no fabric on hand, so that was my first issue. What I did have though were tons of flat sheets from multiple bed-in-a-bags that I never use (who actually uses those flat sheets though?)

I found this cute one!

Cute Grey Zebra Print Fabric!

It was perfect beause I didnt want any crazy colored print but I definitely wanted a print of some sort, so this was perfect.

Then, I took the nasty blue cover off of the ironing board and laid it down on my fabric.

image (18)

I just cut around it leaving about 4 inches just for good measure.

image (17)

I didnt want to get all professional about it and sew a stretchy band to the outside of the fabric to make it removeable because to be honest I dont plan on changing the fabric, and if I do Ill just restaple some new fabric on top of this one…. that was me planning ahead.

In steps my handy dandy staple gun.

Staple Gun Lovin

Thats the one I own and I love it. It has enough power behind it to drive staples into almost anything Ive needed it for, but its not strong enough where it blows me away and I cant work with it accuratly. I got it off amazon for $20.

Here it was after I finished wrapping it in fabric and stapling, which made it look 50x better!:

image (15)

Then I decided I wanted to add a little something extra. Give the ironing board a cute black ruffled boarder!

(Sorry for the bad pic!)

(Sorry for the bad pic!)

And of course it was a wired one so I had to pull out all of the wiring in it, which is always soooooo fun… not!!

Theres that the annoying ball of wire!!

I laid it down around the ironing board and started bunching it up and stapling it away

image (11)

It was looking cute when I flipped it over for a peak, so I just went for it!

image (10)

Heres what the bottom of the ironing board looked like when I was done. Its maybe not the cutest, but who looks at the bottom?! No one! And really, I cannot take an ironing board that seriously.

*Ironing reminds me of laundry and I despise laundry*

There was no way I was wasting time sewing it to make it able to come on and off. And my sewing is not 100% either (I start a sewing class in September like a little old lady!!!)

This was fine with me 🙂

image (9)

Heres what she looked like in the end….

image (8)

The ruffles just made it girly and cute… even more girly then the light grey zebra print. I love it!!!

image (7)

This was a really easy project that gave a makeover to an ugly little ironing board, and turned it into prom queen.

….all for only $2.75!

Organize, Don’t Agonize!

For my Mothers Birthday this past year, I really wanted to surprise her with something. She is a neat freak.

Almost  Definitely OCD.

I knew what I wanted to do… Organize her medicine cabinet. Honestly, I did not take before pictures (this was before the idea of a blog ever crossed my mind) But just imagine a 3 shelved closet with stuff EVERYWHERE! And everything inside old cabinet dividers. I think my mom just never thought it was possible to really organize it all effectively.

I found all kinds of stuff everywhere. Alot of old expired medicine. THROW OUT OLD EXPIRED MEDICINE PEOPLE! I even as far as to write in blue sharpie marker on all of the pain med bottles with their expiration date.

I found things for the dogs in 4 different places. There. was. stuff. everywhere!

I started this with making lists. What did we have in our cabinet that could be grouped together?

Here’s what I came up with:

  1. Nose, Ears, Eyes
  2. Stomach and Heartburn Relief
  3. Pain Relief
  4. Ointments and Thermometers
  5. Cold and Sleep Medicine
  6. Hair products
  7. Bath and Misc.
  8. First Aid
  9. Grandmas Stuff
  10. Nail supplies
  11. Sunscreen  and other suncare products
  12. Hotel toiletries (my mom has some weird obsession)
  13. Girl Stuff
  14. Face stuff

(The dog stuff ended up being put in a container in a whole separate cabinet)

I went to the dollar store and bought somewhere around 16-18 containers in all different sizes for like $20! Everything is legit $1 at this Dollar Store. Awesome! Got them all in blue since its my Moms favorite color

…..Here’s how I was able to organize it…..

aaaaa

I also got two cute mason jars for the cotton balls and Q-Tips.

Oh and I filed this under Girl Stuff because I’m pretty sure no men enjoy organizing a medicine cabinet. Or maybe I’m just sexist 😉

Sometimes I just stare at it. Its all so organized and neat now. Just like I like it!

I like my money right where I can see it…..

Hanging in my closet!!!!

My closet has always been in the basement of our house. My sister and I shared a room up until she went off to college (so my senior year of high school!) therefore she got the closet in our room, and I took the closet downstairs.

The dungeon. That’s more of what it was. It had weird stuff in it.

Old clothes my mom couldn’t part with from the 70’s and 80’s, a crib, a weird little cabinet on wheels filled with books. Then of course my clothes. My clothes on a makeshift clothesline. Pathetic. This went on for far too long. I can’t even believe I’m going to reveal this picture. Unfortunately I didn’t think to take the picture with all my clothes still hung (there’s the ADD in me! I get an idea and my brain turns to mush as I execute) so once I remembered that I wanted a picture of it, I strung a couple things back on the line.

20130812-180503.jpg

Yes that is it. Ew I know. Here’s some more…

20130812-180540.jpg

You can see above the dresser near the ceiling… That pipe… Yea I hung my clothes on there. Yikes.

Here’s when I remembered I wanted one with clothes

20130812-180652.jpg

Just imagine that clothesline PACKED. Like I’m talking near its breaking point PACKED.

20130812-180736.jpg

There’s that scary pipe again.

20130812-180809.jpg

Then there was the wall of nails. Just 30 nails hammered into the wall. We pulled out each. and. every. one. This is really embarrassing!

This room needed a paint job. The walls and the floor. I went to Menard’s and the kind man working there showed me this cement and brick waterproof paint. I got it in a nice light grey (I read that light walls make it easier to find clothes in a closet). My mom and I cleared out the entire room, shopvacced the walls and floor, then wiped them down and let it dry. I painted the walls and it magically made the room already look 100x better! Here’s a before and after

20130812-181453.jpg

20130812-181537.jpg

AMAZING what some paint can do.

Then I knew I needed something to hang my clothes on. Ive tried those cheaply made clothes racks. They suck. So my mom and I found this bad boy from Walmart… It came out to only $118 with tax! I read review after review and it got majority good ones so we decided on this (I just checked the site and its no longer on there 😦 but its by Whitmor! I remember that! It was on amazon too when I found it)

20130812-181711.jpg

Thank you Mike for building it!!!! It was really easy too, I even helped 😉 I really hate building things.

I picked out a nice hounds-tooth print rug for $40 off amazon, along with a $20 purple ottoman, and this awesome bead curtain to hide the back part of the closet.

We put my black dresser back in, mike built a small shoe rack (for my fancy heels to be displayed on!), I bought 4 plastic baskets for the closet organizer…..

And VOILA!!!!! Here’s what I was able to change that dingy room into

20130812-182016.jpg

20130812-182029.jpg

20130812-182035.jpg

20130812-182041.jpg

Then I had even more ideas! My vain side told me “hang mirrors on the back of the sliding doors! So you can get dressed and it’ll be like a store fitting room!” So I ran to target and got 2 cheapy white lightweight mirrors for like $5 each and hung then with those 3m strips

20130812-182235.jpg

Then I needed a place to hang my purses. Pegboard. I knew it had to be pegboard. But then all I pictured was a nasty yellow peg board like the one in our garage. Puke!!! I read you could paint it, but I didn’t wanna risk chipping so instead I bought fabric and fabric wrapped it!

This idea is so much better if your a freak like me and couldn’t bear having all these little peg holes be seen. Fabric covers it up, and you simply slit holes where you want the little metal things to go in! Here’s what I made of that idea…. (purses not hung yet, just layed)

20130812-182508.jpg

Clearly that was when it wasn’t hung yet.

I wrapped it in fabric using a staple gun, and then I used black acrylic paint to make a boarder. The boarder just gives it almost a framed look which I liked. This pegboard got hung over the wall where all those nails once resides. It works out so nice because that wall was not finished, so this almost makes a fake wall! Mike drilled it into the wood for me.

20130812-182639.jpg

All of my dresses hang on these 3 hooks that were already built into the opposite wall

20130812-182745.jpg

Whats that light fixture you ask???? I made that too. It was super easy! I ironed together 5 sheets of wax paper, and cut out almost 120 circles using my e craft (therefore I didn’t manually cut anything the machine did so that made it a lot easier for me, hand cutting… well that would take forever and wouldn’t be fun). Then I hot glue gunned 5 circles to a string of white thread, then attached the strings of circles to a metal basket and staple gunned it to the ceiling around the light!

20130812-182835.jpg

20130812-183041.jpg

Its like a fake Capiz Shell Chandelier!

20130812-183055.jpg

There you have it! A whole new closet! I cant believe what a makeover it is… it was SO LOW RENT before!

Have you ever thought about giving a storage room a make over? I say at least give it some fresh paint and see what a difference that makes alone then get inspired to do more!